Chickpea Blondies!

ChickpeaBlondies
    These kinds of recipes are my favorite because they really challenge conventional thinking. So often people assume “if it tastes good, it’s probably bad for you” and that eating healthfully is a tasteless sacrifice. Sometimes I wonder if this rigid mentality prevents people from even exploring healthful ingredients when making decadent desserts because they just assume the two can’t possibly co-exist. Well, it’s time to wake up! There’s more than one way to make a blondie, people!
     Did you know that a traditional blondie recipe calls for eggs and a whole stick of butter? A whole stick?! Eggs and butter don’t have magical super powers that make them irreplaceable. We use them in our baked goods for no other reason than because that’s what we’ve been taught. But there are many, many other options that are both better for our health and leave the animals alone. This blondie recipe, which uses chickpeas, peanut butter, and ground flaxseeds, is just as delicious and decadent as any non-vegan dessert anywhere. Make this and I guarantee you’ll wonder why in the world you ever thought you needed butter and eggs. You’ll turn to the heavens above and ask how you could have been so blind for so long. And just before you sink into deep despair you’ll remember you have these blondies to nourish your soul and all will be well.
(makes a 9×13 pan)
Ingredients:
3 cups chickpeas (or 2 cans drained and rinsed)
1 1/2 tsp baking powder
1/4 tsp baking soda
1 1/2 cup brown sugar
4 tsp vanilla extract
1/2  cup ground flaxseeds
1/2 cup peanut butter
1 cup vegan chocolate chips
Instructions:
1. Preheat oven to 350 degrees. In a food processor, blend all ingredients except the chocolate chips.
2. Line the pan with tinfoil or a small amount of canola oil. Spread the batter into the pan. Sprinkle chips on top.
3. Bake for 30 minutes. Let cool before eating. Store in the fridge. Enjoy! You are in for a treat!
Source: http://chocolatecoveredkatie.com/2011/05/18/chocolate-chip-blondies-and-theyre-good-for-you/

Book Recommendation: “Artisan Vegan Cheese”

Mozz2

“I could never give up cheese.”
Based on the frequency that I hear this, I thought about making this post all about the reasons why you should stop eating cheese yesterday. I could have written about how detrimental animal cheese is to your health, delving into the link between dairy products and various types of cancer, including breast, ovarian and prostate. I could have discussed how dairy is actually really bad for your bones. After all, countries with the lowest rates of dairy consumption have the lowest rates of osteoporosis and that dairy has actually been singled out as the biggest cause of osteoporosis. I could have gone over the fact that a whopping 75% of the world’s population are genetically unable to digest dairy, yet we label this near universal human trait a defect and call it “lactose intolerance.” When we are babies all humans have an enzyme that allows us to digest our mother’s milk but we lose that enzyme between ages two and five because we are supposed to be weaned by then. Our bodies weren’t designed to be consuming milk into adulthood (not to mention the milk of another species!). I could also have also told you about how the veal industry is the byproduct of the dairy industry. In order to produce milk, cows–like humans–have to be pregnant and give birth. That means every glass of milk, every slice of cheese, and every scoop of ice cream is the product of a mother cow enduring a nine-month pregnancy only to have her baby immediately taken from her at birth so humans can consume her milk. If her baby is a male, he is slaughtered as veal. If her baby is a female, she is condemned to the same agonizing fate as her mother. To keep a dairy cow producing milk, she must constantly be pregnant, so just after her baby is torn away from her she is impregnated again. The painful cycle then repeats, year after year, until her body can give no more and she too is slaughtered.
But I’m not going to make this post about why you should give up cheese.
Instead, thanks to the brilliant book Artisan Vegan Cheese by Miyoko Schinner, I’ll simply tell you that you don’t have to give up cheese because you can make your own unbelievably delicious plant-based cheese. I have spent the past several weeks making eight different vegan cheeses from this book and, as a former dairy cheese lover myself, I am thoroughly impressed. Some of the recipes take a few minutes to prepare while others take a few weeks, even months, to culture but what consistently manifests are complex plant-based cheeses that are strikingly similar to their dairy counterparts. The first time I sampled the cashew-based mozzarella I was so startled at how similar it was to the dairy-based version that I had keep reminding myself that it was vegan and that I needn’t resist it. It was pretty wild.
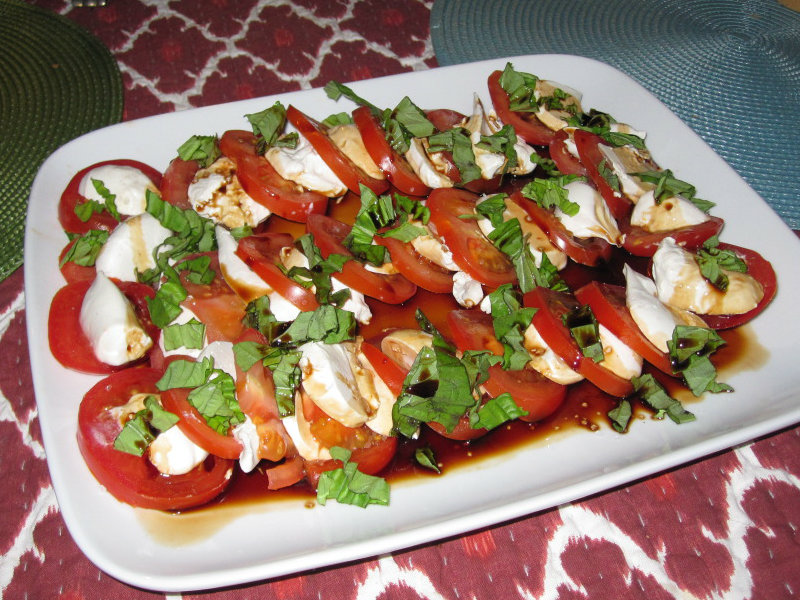
Pictured above is a caprese salad with Schinner’s mozzarella recipe which I served during our at-home fancy date night this weekend. Below is a brie which I had out while our non-vegan friend was visiting from out of town. We all agreed it was a hit. It was creamy, fancy, and had that perfect melt-in-your-mouth texture. I’ve also got parmesan, provolone, gouda, two types of cheddar, American, and cream cheese in the works. (Click “read more” below for the recipe for American cheese.)

American Cheese

This cheese is EXCELLENT for a grilled cheese sandwich!
Ingredients:
2 1/2 cups water
1 cup rolled oats
2/3 cup nutritional yeast
1 teaspoon freshly squeezed lemon juice
3 tablespoons medium brown miso paste
1/2 roasted red bell pepper, skinned and seeded
1/2 teaspoon salt
1 teaspoon prepared mustard
3 tablespoons agar flakes
1 tablespoon carrageenan powder (I couldn’t find this so I just added an additional tablespoon of agar flakes)
Instructions:
1. Put the water and oats in a heavy medium saucepan and bring to a boil over medium-high heat. Decrease the heat to medium-low and simmer, stirring frequently, until thick, about 5 minutes.
2. Transfer to a blender. Add the nutritional yeast, lemon juice, miso, bell pepper, salt, and mustard. Process until smooth and creamy.
3. Transfer to a heavy medium saucepan and whisk in the agar and carrageenan. Cook over medium heat, stirring frequently with the whisk, until thick, 4-5 minutes.
4. Pour the mixture into a glass or nonreactive metal mold or ramekin and smooth the top. Cover and let cool completely at room temperature. Refrigerate for at least 6 hours, until firm.
Storage notes: Will keep for about 2 weeks in the refrigerator or 4 months in the freezer.

Incredibly Easy Pumpkin Chili

PumpkinChili2

Believe it or not, I used to hate cooking. I resented having to follow directions for an activity that I believed was meant be creative. But every time I tried to get creative, tossing in a little of this, a dash of that, followed by a twirl, a curtsey, etc., the food was just a sorry disappointment. After too many failed dishes I knew I needed to follow instructions but I still wanted to feel like the dish was my creation. I was able to find a happy balance making dishes that called for just a few ingredients and minimal measuring. For those who are new to cooking, short on time, or just looking for a unique take on chili, this recipe delivers. It is so simple. All you have to do is chop a few vegetables and dump a few cans, but it also feels really creative and unusual because of the pumpkin. The result is a delicious chili that’s warm, comforting, and just a touch sweet.
Over time, you could also get more creative and try adding different colored peppers, other kinds of beans, or using sweet potato instead of pumpkin (see below for more ideas). With such good and simple flavors it would hard to mess this one up.

Ingredients:
1 onion, diced
2 cloves garlic, diced
1 red bell pepper, diced
1 can (15 oz) organic corn, preferably sweet
1 large can (28 oz) fire-roasted diced tomatoes
1 can pumpkin puree (NOT pumpkin pie puree)
1 can chickpeas, drained
1 can black beans, drained
1 tbsp chili powder
2 tsp cumin
1/4 tsp cayenne (optional)
1 cup vegetable broth or water (more if you prefer a thinner consistency)

Instructions:
1. In a large skillet over medium heat, saute the onion, garlic, and red pepper in 1-2 tbsp water or vegetable broth for about 10 minutes or until tender.
2. Stir in the remaining ingredients, increase the heat to high, and bring to a boil.
3. Immediately reduce the heat to medium-low and simmer for 15-20 minutes until heated through. Serve hot.

Variations to try:
– To make this chili thicker and heartier, add 2 cups cooked quinoa after step 2.
– Add fresh or frozen de-thawed greens, such as kale, spinach, collards, etc., while simmering during step 3.
– For a slightly sweeter chili, use canned sweet potato instead of pumpkin.

– Double or triple the ingredients to make several days’ worth of food. Leftovers can also be frozen.
– Try using just one kind of bean (for example, only black beans) or add several different kinds in addition to the beans already used (such as pinto, kidney, and white beans).

Black Bean Brownies!

BlackBeanBrownies_zps651fac36

I know these sound a little weird, but trust me, they are THE. BEST. Because black beans have a neutral flavor they essentially function as the flour in this recipe. I’ve started eating them every day with my green breakfast smoothie.
Yes, I eat brownies every day. Don’t judge.
Besides the semi-sweet chocolate chips, these brownies have no processed sugar and are instead sweetened with dates, stevia, and a banana. Black beans are high in protein; an excellent source of folate, magnesium, phosphorus, manganese, and thiamin; and they are rich in dietary fiber. Unsweetened cocoa powder also provides protein, fiber, phosphorous, magnesium, and manganese as well as riboflavin, zinc, iron, potassium, and copper.
So, YEAH, I eat brownies every day.
Many of the black bean brownies recipes I’ve found use oil; however, I prefer to use water and don’t really notice a difference in texture. These brownies are more fudgey than cakie, which I like, but if you prefer cakie just add less water. I recommend using your own soaked, cooked, and drained black beans rather than canned beans to avoid excess water. (I used canned beans recently while visiting my in-laws down South and it resulted in a soupy batter. This was unfortunate as they were already skeptical enough about trying my crazy vegan brownies with beans so I was disappointed I made a batch that didn’t live up to their usual mouthwatering goodness. Arg! Regrets!!) If you refuse to heed my wise advice, then at least fully drain the liquid from the cans and maybe ease up on the amount of water you add. Also, be sure the cans say “no added salt.”
While I personally don’t want to mess with perfection, these would certainly also be good with some nuts like pecans and walnuts. Enjoy!!

Ingredients:
4 cups black beans
1 banana
15 medjool dates
1/2 cup unsweetened apple sauce
1 cup unsweetened cocoa or carob powder
1 tablespoon vanilla extract
1 cup water
1 cup semi-sweet vegan chocolate chips* (optional)

Instructions:
1. Preheat the oven to 350 degrees. Line a glass baking dish with parchment paper.
2. Put all the ingredients except the chocolate chips into a food processor. Pulse until creamy.
3. Spread the batter into pan and sprinkle the chocolate chips evenly on top.
4. Cook for 35-45 minutes, or until a knife comes out clean(-ish) after inserting. Don’t cook more than 50 minutes even if your knife comes out with batter. Just remove pan from stove and allow it to cool completely. Store in the fridge.

* Chocolate IS vegan! After all, cocoa comes from a bean. However, many lower quality chocolate companies add non-vegan ingredients like milk and milk fat. Higher quality dark chocolate chips are often vegan even if they don’t announce it on the package. They’ll be made with pure, simple ingredients: cocoa, cocoa butter, lecithin, sugar, and sometimes vanilla. So just check the back and read the ingredients. Here’s some more info from Food Empowerment Project on vegan chocolate that’s also slavery-free.

Eggplant Rollatini

IMG_2796-1

I don’t like to do taste tests while I’m cooking when I follow a recipe for the first time. I prefer to wait till the dish is complete to assess and then make notes in my cookbook if necessary. The first time I was cooking this dish, though, I took a little spoonful of the filling just before I put it in the oven and was totally impressed. (To think I had only picked this dish out because I like eggplant!) The tahini makes the filling so deliciously rich and creamy. The finished result is even better with a sauce that has just the right amount of sweetness and tang. The ingredients are so clean and simple but they come together in a way that truly surprised me. The only note I made for this was to double it for next time!

Ingredients:
Filling:
2 eggplants
3 cups cooked lentils
1 tbsp miso paste
3 tbsp tahini
2 tbsp fresh minced oregano
2 tbsp fresh minced basil
2 tbsp fresh squeezed lemon juice
2 cloves garlic, minced
Sauce:
1 cup sundried tomatoes, soaked in warm water for 20 minutes
1 can diced tomatoes
1 small can tomato paste
1/4 tsp salt
2 garlic cloves
2 tbsp chopped fresh basil
1 date
2 tbsp shallot, minced

Instructions:
1. Cut off the ends of the eggplants. With flat end down on the cutting board, slice into 1/4-inch strips.
2. Heat oven to 350 degrees. Lay the eggplant strips flat on a parchment paper-lined baking sheet. Bake for 15 minutes and then set aside until cool enough to handle.
3. Meanwhile, in a medium bowl, mix together all the remaining filling ingredients. Set aside.
4. Blend all the sauce ingredients together in a blender until fully combined.
5. Spread 1 cup of the sauce on a baking dish. On a separate work surface lay each eggplant strip flat and spread 1 heaping tablespoon of filling (though if you like your rollatini thick there’s no need to hold back!). Roll up into a cylinder and and place atop of the bed of sauce.
6. Pour the remaining sauce on top and cover with aluminum foil. Bake for 30 minutes, until heated through and the sauce is bubbly.

Source: Thrive Foods by Brendan Brazier

Dark Chocolate Coconut Cookies! Rawr!

IMG_2792-1

We love our oatmeal chocolate chip cookies but we wanted to mix it up a bit and have something that would make for a healthier pre-workout snack. Well, oh my lord, these are incredible! Wow! They taste just like moist brownies. But, believe it or not, they have very little added sugar and require no baking, and include the health-promoting ingredient maca, which means we can better justify indulging in several cookies on a daily basis.

Ingredients:
Makes about 18 cookies.
(Some of these ingredients may require a visit to a health food store or the “green” section of your supermarket. Or you can use the links I’ve provided and order the ingredients online. Trust me, these are so good, it’s worth it!)
1/2 cup shredded coconut
2/3 cup coconut flour
4 tbsp cocoa powder
4 tsp maca powder
3 tbsp agave nectar
4 tbsp almond butter
1 tsp vanilla extract
12 large Medjool dates, pits removed
3/4 cup dark chocolate chips

Instructions:
1. Heat a small frying pan over low heat and add the coconut. Toast coconut until it has turned an amber color, about 1-2 minutes, stirring constantly. Remove from heat.
2. Place the toasted coconut, coconut flour, cocoa powder, maca, and agave into a food processor and start the machine.
3. Add the almond butter and vanilla extract, then one at a time, add the pitted dates and process until a crumbly dough has formed. The dough should be, well, doughy. Like a thick cookie dough. If too wet, add additional coconut flour. If too dry, add water, a little at a time, until optimal doughiness is achieved.
4. Transfer to a bowl and mix in the dark chocolate chips. Using clean hands, grab about a table spoon and squeeze and roll to form a tight ball. Flatten the ball using your palm to form a small cookie. You’re welcome!

Curry Lentil Rice Pizza

IMG_2558

This “pizza” has become a staple in our home because it’s really tasty and makes enough leftovers for several lunches. The recipe comes from Thrive by Brendan Brazier, the professional Ironman triathlete (and a vegan, of course). Brazier’s recipes are based on the concept of “high net-gain nutrition,” meaning eating foods that leave you with more energy, not less. According to Brazier, most foods in the average North American’s diet require almost as much energy to digest and process as they contain, therefore the net gain is extremely low. As a result, people feel weaker and hungrier, and their bodies are less resilient and their health more compromised. However, nutrient-dense whole foods–those foods that have not been refined and stripped of their value during processing–eliminate excess work for the body thereby leaving us with more energy, more physical resilience, and more mental clarity. It’s a simple concept that makes a lot of sense. I’d highly recommend this book to anyone interested in fitness, or health in general. Plus, the recipes are great.

Ingredients:
Crust:
3 cups cooked brown rice
3 cups cooked lentils
4 tsp curry powder
2 tsp dried basil
Sea salt to taste
Topping:
Nutritional yeast
2 yellow or orange tomatoes, chopped
2 yellow or orange bell peppers, sliced
1 medium sweet potato or 3 large carrots, thinly sliced
1 cup green onions, chopped
2 tsp oregano
2 tsp thyme

Instructions:
1. Preheat oven to 300 degrees.
2. In a food processor or by hand, combine all crust ingredients until mixture starts to ball up.
3. Lightly oil an 11-by-15-inch baking tray. Spread crust mixture evenly on tray.
4. Sprinkle nutritional yeast on top of the crust. Use as much or as little as desired (we use a lot!). Add toppings.
5. Bake for approximately 1 hour (this may vary slightly depending on the moisture content of the vegetables).

Tamarind BBQ Tempeh + Sweet Potatoes

IMG_25692

Ingredients (Serves 4):
4 cloves garlic
1 tablespoon minced fresh ginger
3/4 cup vegetable broth
2 teaspoon arrowroot dissolved in 1/4 cup water
2 tablespoons tomato paste
1 tablespoon tamarind concentrate
3 tablespoons agave or maple syrup
2 tablespoons tamari or soy sauce
1 teaspoon liquid smoke
1/8 teaspoon cayenne (optional)
1 1/2 pounds sweet potatoes, peeled and sliced into chunks or rounds
12 ounces tempeh, cut into 1/2-inch slices

Instructions:
1. Spray a casserole pan (preferably not glass) with nonstick cooking spray.
2. In a medium-size mixing bowl, whisk together all the ingredients (except the sweet potatoes and tempeh). Make sure to get the tamarind dissolved.
3. Place the sweet potatoes and tempeh in the prepared pan. Pour the sauce over them. Be sure everything is coated well, using your hands if necessary. You can bake immediately or let marinate for at least an hour to get more flavor into the tempeh.
4. When ready to bake, preheat the oven to 400 degrees. Cover the pan with tinfoil and bake for about 25 minutes.
5. Remove from the oven and toss out the tinfoil. Flip the tempeh and sweet potatoes, making sure to scrape the bottom with a spatula in case anything is sticking.
6. Bake for another 30 minutes, flipping everything once. The sweet potatoes should be tender but not mushy, and the sauce should be thickened and coating everything. Give thanks and enjoy!

Source: Appetite for Reduction by Isa Chandra Moskowitz

Apple Cinnamon Energy Bars

IMG_2331-22                       IMG_2333-12

These energy bars are a staple in our house. Robert brings two to work everyday. The recipe comes from Thrive: The Vegan Nutrition guide to Optimal Performance in Sports and Life by Brendan Brazier, the professional ironman and triathlete. Unlike commercial energy bars which provide sugary stimulation from highly-processed ingredients, these homemade bars provide real nourishment that delivers sustainable energy. We wrap them individually and store them in the freezer. They wont freeze solid (no thawing necessary) but will maintain their chewiness so they are perfect to bring along on a hot or cold day.

Ingredients:
1 small apple, cored
1 cup dried dates
1/2 up cooked quinoa
1/4 cup almonds
1/4 cup ground flaxseed
1/4 cup hemp protein
2 tsp cinnamon
1/2 tsp nutmeg

Instructions:
1. In a food processor, process all ingredients together to desired mushiness.
2. Shape into balls or bars. Wet hands with water while shaping to prevent sticking. Recipe yields about 12 bars.

Wholehearted Granola

IMG_2326-21

Can granola motivate you to get out of bed in the morning? This one sure can! Yes, it is that good. Not only will you adore the taste, but it’s packed with fiber, protein, and essential fatty acids so it’ll leave you well-nourished and well-satiated for hours. I love eating it dry while Robert usually eats it with almond milk. Either way, it’s good stuff!

Ingredients:
1 apple, diced
2 cups oats
1 cup sunflower seeds
1 cup ground flaxseed
1 cup hemp protein
1 cup unhulled sesame seeds
1 cup raw almonds, diced
3 tsp cinnamon
1/2 tsp nutmeg 1 packet ground stevia leaf (1/2 tsp)
1/2 tsp sea salt
1/2 cup molasses

Instructions:
1. Preheat oven to 250 degrees.
2. Combine all the ingredients in a bowl and mix well.
3. Spread on a baking tray lined with parchment paper. Bake for 1 hour or until toasted. Let cool and store in the fridge.

Source: I adopted this recipe from Thrive: The Vegan Nutrition Guide to Optimal Performance in Sports and Life by Brendan Brazier. The only part I changed was omitting the oil.